Switch Agent Installation
Prerequisite Steps
Nvidia Cumulus Linux Devices
Requirements: * Fresh install of Cumulus Linux v. 3.7.(x) - Cumulus 4.X is in the process of validation and will be supported in the next Netris release.
Configure the OOB Management IP address
Configure internet connectivity via management port.
sudo vim /etc/network/interfaces
# The loopback network interface
auto lo
iface lo inet loopback

# The primary network interface
auto eth0
iface eth0 inet static
        address <management IP address/prefix length>
        gateway <gateway of management network>
        dns-nameserver <dns server>

source /etc/network/interfaces.d/*
sudo ifreload -a
Configure Nvidia Cumulus Linux License
sudo cl-license -i
Copy/paste the Cumulus Linux license string then press ctrl-d.
Continue to “Install the Netris Agent” section.
Ubuntu SwitchDev Devices
Note
Further installation requires a Console and Internet connectivity via management port!
NOS Uninstall
Uninstall current NOS using Uninstall OS from grub menu:
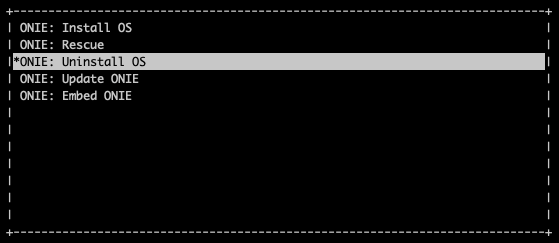
Once the uninstallation is completed, the switch will reboot automatically.
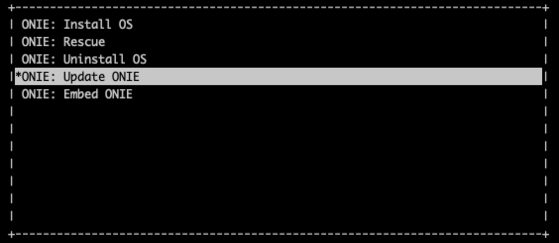
Update ONIE
Select Update ONIE from grub menu:
In case you don’t have DHCP in the management network, then stop ONIE discovery service and configure IP address and default gateway manually:
onie-discovery-stop
ip addr add <management IP address/prefix> dev eth0
ip route add default via <gateway of management network>
echo "nameserver <dns server>" > /etc/resolv.conf
Update ONIE to the supported version.
Note
ONIE image available for Mellanox switches only!
onie-self-update http://downloads.netris.ai/onie-updater-x86_64-mlnx_x86-r0
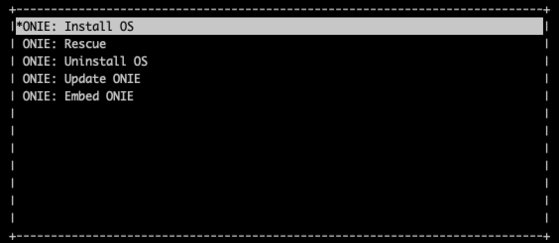
NOS Install
Select Install OS from grub menu:
In case you don’t have DHCP in the management network, then stop ONIE discovery service and configure IP address and default gateway manually:
onie-discovery-stop
ip addr add <management IP address/prefix> dev eth0
ip route add default via <gateway of management network>
echo "nameserver <dns server>" > /etc/resolv.conf
Install Ubuntu-SwitchDev from the Netris custom image:
onie-nos-install http://downloads.netris.ai/netris-ubuntu-18.04.1.bin
Default username/password
netris/newNet0ps
Configure the OOB Management IP address
Configure internet connectivity via management port.
sudo vim /etc/network/interfaces
# The loopback network interface
auto lo
iface lo inet loopback

# The primary network interface
auto eth0
iface eth0 inet static
        address <management IP address/prefix length>
        gateway <gateway of management network>
        dns-nameserver <dns server>

source /etc/network/interfaces.d/*
sudo ifreload -a
Continue to “Install the Netris Agent” section.
EdgeCore SONiC Devices
Note
Further installation requires a Console and Internet connectivity via management port!
NOS Uninstall
Uninstall current NOS using Uninstall OS from grub menu:
Once the uninstallation is completed, the switch will reboot automatically.
NOS Install
Select Install OS from grub menu:
In case you don’t have DHCP in the management network, then stop ONIE discovery service and configure IP address and default gateway manually:
onie-discovery-stop
ip addr add <management IP address/prefix> dev eth0
ip route add default via <gateway of management network>
echo "nameserver <dns server>" > /etc/resolv.conf
Install EdgeCore SONiC image from the Netris repository:
onie-nos-install http://downloads.netris.ai/Edgecore-SONiC_20211125_074752_ec202012_227.bin
Default username/password
admin/YourPaSsWoRd
Configure the OOB Management IP address
Disable Zero Touch Provisioning for time being.
ztp disable -y
Note
This will take some time, please be patient.
Configure internet connectivity via management port.
ip addr add <management IP address/prefix> dev eth0
ip route add default via <gateway of management network>
echo "nameserver <dns server>" > /etc/resolv.conf
Continue to “Install the Netris Agent” section.
Install the Netris Agent
Add the Switch in the controller Inventory. Detailed configuration documentation is available here: “Adding Switches”
Once the Switch is created in the Inventory, click on three vertical dots (⋮) on the right side on the Switch and select the Install Agent option
Copy the agent install command to your clipboard and run the command on the Switch
Reboot the Switch when the installation completes
sudo reboot
Once the switch boots up you should see its heartbeat going from Critical to OK in Net→Inventory, Telescope→Dashboard, and switch color will reflect its health in Net→Topology
Screenshot: Net→Inventory
