Logo slack_icon Join Slack
Link Aggregation (LAG) — Netris Documentation

General Information

  • Definitions
  • Introduction to Netris
  • Netris Supported Functionality & Platforms Matrix
    • Switch Fabric Management Functions
    • Monitoring & Telemetry
    • External Routing Functions
    • Cloud Networking Functions & Constructs
    • Overlay Network Functions
    • AI Specific Functions
    • Compute Platform Integrations
    • Security
    • Netris Controller Administration
    • Management Interfaces
    • Hypervisor/Worker node specific functionality
  • SoftGate Data Plane Variations
  • Netris and NOS versions compatibility matrix
  • Hardware Requirements
    • Netris Controller
    • Netris SoftGate HS (Multi-VPC version)
  • Supported Switch Hardware
    • Nvidia
    • Dell
    • EdgeCore
    • Arista
  • Netris Architecture
    • Netris Controller
    • Netris Switch Agent
    • Netris SoftGate

Try & Learn Netris

  • Netris Try & Learn
    • Netris Infrastructure Simulation Platform
    • Netris Test Controller & Infrastructure Simulation
      • Web Console
      • SSH
      • Netris Init Modules
      • Start/Stop a Simulation
    • Lab Scenario: GPU-as-a-Service network with NVIDIA Spectrum-X architecture
      • Initialize the Netris controller
      • Start a simulation
      • Monitoring Dashboard
      • Topology
      • SSH to Switches
      • SSH to GPU servers
      • NHN (Netris host networking plugin)
      • Server Cluster Template
      • Server Cluster
      • Checking the connectivity
      • Cleanup the Controller

Tutorials

  • NHN - Netris Host Networking Plugin
    • Installation
      • Step 1: Install the Netris NHN Plugin
      • Step 2: Upload Required Packages
      • Step 3: Configure DPU Parameters
      • Step 5: Verify the Netris NHN Service
  • Netris VPC
    • Sites
    • IPAM
    • V-Nets
    • External connections
    • SiteMesh connections
    • NAT services
    • Load-balancing service
    • Access lists
    • Working with Netris VPC
  • Netris Generic Tutorials
    • Installing a Netris Controller
      • Security Matters
    • Upgrade and Rollback
      • Netris upgrade Procedure
        • Backup current database
        • Stop Netris Agents
        • Check your current version
        • Upgrade the Controller
        • Check the upgraded version
        • Upgrade Switches and SoftGate nodes
      • Rollback Procedure
        • Stop Netris Agents
        • Restore The Database
        • Downgrade the Controller Software
        • Downgrade Netris Agent Software
  • VPC Anywhere Getting Started Guide
    • VPC Anywhere Overview
      • Introduction
      • Concept
    • Install a Netris Controller
      • Requirements and Installation steps
      • Security Matters
    • Check Default Site Settings
    • SoftGate Installation
      • Minimum Hardware Requirements
      • SoftGate software provisioning
    • Connecting VPC to upstream networks (use one of two options)
      • Using a VLAN with public IP addresses (DMZ)
      • BGP Upstream
        • BGP Upstream: overview
        • BGP Upstream: configuration
    • IPAM Setup for Services
      • Create an allocation
      • Enable on-demand L4 (elastic) Load Balancer
      • Enable Network Address Translation (NAT)
    • Using NAT services
      • MASQUERADE
      • SNAT
      • DNAT
    • Using V-Net (isolated virtual network) services
      • Creating a V-Net
    • Using on-demand (elastic) L4 Load Balancer service
    • Using Multi-interface SoftGate
      • Creating a V-Net
      • SoftGate to SoftGate Link
  • Getting Started with Equinix Metal VPC
    • Installing a Netris Controller on Equinix Metal on-demand server
      • Installation Steps
      • Security Matters
    • Enable Equinix Metal API integration
    • Provisioning Netris SoftGate nodes in Equinix Metal Project
    • Activating BGP on Equinix Metal Project
    • Enabling services (NAT, V-Net, Load Balancer, IP pools)
      • 1) Requesting new Public IP address block
      • 2) Enable on-demand (elastic) Load Balancer
      • 3) Enable V-Net
      • 4) Enable NAT
    • Using V-Net (isolated virtual network) services in Equinix Metal Project
      • Tags
      • Unmanaged
    • Using on-demand (elastic) L4 Load Balancer service
  • Getting Started with PhoenixNAP VPC
    • Netris VPC for phoenixNAP BMC Overview
      • Introduction
      • Concept
    • Installing Netris on phoenixNAP BMC
    • IPAM Setup for Services
      • Option 1 - Separated allocation for each purpose
        • 1. Enable on-demand (elastic) Load Balancer
        • 2. Enable NAT
      • Option 2 - Splitting single allocation into different subnets
        • 1. Enable on-demand (elastic) Load Balancer
        • 2. Enable NAT
      • Note*
    • Using NAT services in phoenixNAP BMC
      • Option 1 - MASQUERADE
      • Option 2 - SNAT
      • DNAT
    • Using V-Net (isolated virtual network) services in phoenixNAP BMC
      • Adding Subnets for V-Net
      • Creating a V-Net
        • Deploy a new server w/ dynamic IP into an existing V-Net
        • Deploy a new server w/ static IP into an existing V-Net
        • Tags
        • Unmanaged
    • Using on-demand (elastic) L4 Load Balancer service in phoenixNAP BMC
  • Enabling Site Mesh with AWS
    • Site Mesh with AWS Overview
      • Introduction
      • Concept
    • Deploy a Softgate in AWS
      • Create an EC2 instance
      • Configure Netris Controller
        • Pre-Requisite Steps
        • Add AWS VPC Subnet into the Netris Controller
        • Static route for AWS VPC Subnet in Netris Controller
        • Create the Softgate in the Netris Controller
        • Netris SoftGate node provisioning
      • Configure AWS VPC
        • Adding routes
        • EC2 Source / destination check
      • Enabling Site Mesh
  • Enabling Site Mesh with GCP
    • Site Mesh with GCP Overview
      • Introduction
      • Concept
    • Deploy a Softgate in GCP
      • Create a VM instance
      • Configure Netris Controller
        • Pre-Requisite Steps
        • Create the Softgate in the Netris Controller
        • Add GCP VPC Subnet(s) into the Netris Controller
        • Static route for GCP VPC Subnet(s) in Netris Controller
        • Netris SoftGate node provisioning
      • Configure routing in GCP VPC
      • Enabling Site Mesh
  • Getting Started with Switch-Fabric Manager & VPC
    • Netris managed fabric Overview
      • Introduction
      • Concept
    • Install a Netris Controller
      • Requirements and Installation steps
      • Security Matters
    • New Site setup
    • VPC setup
    • IPAM setup
    • Inventory setup
    • Topology setup
    • SoftGate software provisioning
      • SoftGate PRO (100G) software provisioning
      • SoftGate (1G, 10G) software provisioning
    • Netris Switch Agent Installation
    • Connecting Netris managed fabric to an ISP
    • Connecting servers to the Netris managed fabric
    • Enabling NAT services
    • Enabling Load-balancing services
    • More features
  • Netris-CloudStack Integration
    • High-Level Concept of Integration
      • How It Works
      • Challenges Addressed
      • Benefits
      • Use Cases
    • Compute and Network Architecture
      • Diagram Overview
      • Network Flow
    • Prerequisites
      • Step-by-Step Configuration Instructions for the Netris Controller
      • IPAM Setup
        • Create an Allocation
        • Create Subnets
      • Inventory Setup
        • Adding Servers
        • Creating Servers’ Links
        • Optimize BGP Overlay for Hypervisor
        • Adding Subnets for CloudStack Cluster
        • Enabling Internet Connectivity for ACS Servers
        • Enabling Access to CloudStack Management GUI
        • Creating CloudStack Networks
    • Server Configuration and Software Installation
      • Configuring Network on CloudStack Management Server (Server 1)
        • Understanding the Network Layout
        • Netplan Configuration
      • Install Netris-CloudStack Agent on Hypervisor Servers
        • Bringing Up NICs Before Installation
        • Pre-Installation Steps (For Deployments Without OOB)
        • Key Functions of the Netris-CloudStack Agent
        • Installation Steps
        • Example Successful Output of One-Liner Script
        • Verification Steps
        • Checking Network Connectivity
        • Finalizing the Network Setup
        • Keeping the Temporary OOB VNet for Emergency Access
        • Managing Additional NICs on the Server
      • Install CloudStack Management Service
        • Installation Steps
    • Configuring CloudStack for Netris Integration
      • Enabling the Netris Plugin in CloudStack
      • Initializing CloudStack Setup
        • Steps to Initialize CloudStack
    • Using CloudStack with Netris Isolation Method
      • Creating a VPC
      • Creating a Network Tier
      • Port Forwarding
        • Seamless Integration Between CloudStack and Netris
        • Step-by-Step Process for Configuring Port Forwarding in CloudStack with Netris
        • Key Notes:
      • Configuring Static NAT in CloudStack
        • How Static NAT Works with CloudStack and Netris
        • Steps to Configure Static NAT:
        • How CloudStack and Netris Work Together
        • Final Notes
  • NVIDIA UFM Integration Plugin for Netris Controller
    • Overview
      • Key Benefits
    • Architecture
    • Prerequisites
    • Installation
      • Option 1: Deploy within an existing Netris Controller Kubernetes cluster
      • Option 2: Deploy as a standalone Docker container
    • Configuration Parameters
      • Netris Controller Configuration
      • NVIDIA UFM Configuration
      • Agent Configuration
    • Usage Guide
      • 1. Server Configuration in Netris
      • 2. Create a Server Cluster Template
        • Understanding the Template Structure
      • 3. Create Server Clusters
      • 8. Verification
      • 3. Monitoring Integration Status
    • Functional Workflow
    • Monitoring and Troubleshooting
      • Viewing Logs
      • Common Issues and Solutions
        • Connection Issues to Netris Controller or UFM
        • PKey Assignment Issues
        • SHARP Reservation Issues
        • Synchronization Delays
    • Version Compatibility
    • Getting Started Guide
      • Quick Setup Example
    • Additional Resources

Cloud Native Tools

  • Kubernetes Integration
    • Install Netris Operator
      • Helm Chart Method
      • Regular Manifest Method
    • Using Type ‘LoadBalancer’
    • Using Netris Custom Resources
      • Introduction to Netris Custom Resources
      • L4LB Custom Resource
      • V-Net Custom Resource
      • BGP Custom Resource
      • Importing existing resources from Netris Controller to Kubernetes
      • Reclaim Policy
    • Calico CNI Integration
      • Disabling Netris-Calico Integration
  • Terraform: Netris provider
    • Install Terraform
    • Create a directory for Terraform files
    • Configure a provider
    • Prepare an infrastructure plan
    • Create resources
    • Delete resources

Network Services

  • V-Net
    • V-Net Fields
  • L3 Load Balancer (Anycast LB)
    • Creating an L3 Load Balancer
  • L4 Load Balancer (L4LB)
    • Enabling L4LB service
    • Consuming L4LB service
  • Access Control Lists (ACL)
    • ACL Default Policy
    • ACL Rules
    • ACL Approval Workflow
    • ACL Processing Order
  • ROH (Routing on the Host)
    • Adding ROH Hosts

Network Policies

  • VPC
    • Adding new VPC
  • IP Address Management
    • Allocations and Subnets
    • IPAM Tree View
    • Add an Allocation
    • Add a Subnet
  • Basic BGP
    • Adding BGP Peers
  • Advanced BGP
    • BGP Objects
      • IPv4 Prefix
      • IPv6 Prefix
      • Community
    • BGP route-maps
  • Static Routing
  • NAT
    • Enabling NAT
    • Defining NAT rules
  • SiteMesh
  • Looking Glass

Operations

  • Accounts
    • Users
    • Tenants
    • Permission Groups
    • User Roles
  • Maintenance Mode
    • Overview
    • Maintenance Mode for Softgate - What’s happening behind the scenes?
    • Maintenance Mode for Switch - What’s happening behind the scenes?
  • Upgrade and Rollback
    • Netris upgrade Procedure
      • Backup current database
      • Stop Netris Agents
      • Check your current version
      • Upgrade the Controller
      • Check the upgraded version
      • Upgrade Switches and SoftGate nodes
    • Rollback Procedure
      • Stop Netris Agents
      • Restore The Database
      • Downgrade the Controller Software
      • Downgrade Netris Agent Software
  • Visibility (Telescope)
    • Graph Boards
    • API Logs
    • Dashboard

Monitoring & Observability

  • Monitoring & Observability
    • Topology & Wiring Validation
      • Switch-to-switch and Switch-to-SoftGate
      • Switch-to-Server
    • NVIDIA NetQ Integration
      • Topology Blueprint Activation

Switch-fabric Management

  • Inventory
    • Inventory Profiles
    • Adding Switches
    • Adding SoftGates
    • Viewing Inventory
  • Topology Manager
    • Adding Links
  • Switch Ports
  • Link Aggregation (LAG)
    • Automatic LAG with EVPN Multi-homing
    • Custom LAG

Detailed Installation

  • Controller Installation
    • Netris Controller installation on a generic Linux host
      • Linux Host requirements
      • Installation
        • Installation with the specific host name
        • Installation with the Let’s Encrypt SSL
        • Installation with the Custom SSL Issuer
      • Upgrading
      • Uninstalling
      • Backup and Restore
        • Backup
        • Restore
    • Helm Chart Installation
      • Requirements
      • Get Repo Info
      • Installing the Chart
      • Uninstalling the Chart
      • Chart Configuration
    • Netris Local Repository Setup
      • When & Why to Use the Local Repository?
      • How to Enable the Local Repository on the Netris Controller?
      • How to consume local repository
      • Upgrade Local-Repo Cache
    • Installing Netris Controller in Air-Gapped Environments
      • Why Air-Gapped Installation?
      • How to Install the Netris Controller
        • Prerequisites
        • Steps to Install
      • After Installation
      • How to consume local repository
    • Installing HA Netris Controller in Air-Gapped Environments
      • Why Air-Gapped Installation?
      • Why a High Availability (HA) Cluster?
      • Prerequisites
      • Obtain the Installation File
      • Steps to Install
        • 1. Preparing Each Node
        • 2. Install K3s on All Nodes
        • 3. Import Necessary Container Images
        • 4. Configure kube-vip for KubeAPI High Availability
        • 5. Add Helm Chart Packages to K3s
        • 6. Verify and Scale Core K3s Components
        • 7. Deploy Kube-VIP Cloud Controller
        • 8. Install Traefik Proxy
        • 9. Deploy the Netris Controller
        • 10. (Optional) Enable SSL with cert-manager
        • 11. Set Up the Local Netris Repository
        • 12. Validate Your Deployment
      • After Installation
      • How to consume local repository
    • Upgrading HA Netris Controller in Air-Gapped Environments
      • Obtain the Upgrade File
      • 1. Preparing Each Node
        • 1.1 Transfer the File to the Servers
        • 1.2 Extract the Tarball
        • 1.3 Navigate to the Installation Directory
      • 2. Steps to Upgrade Controller
        • 2.1 Import Necessary Container Images
        • 2.2 Add Helm Chart Packages Upgrades to K3s
        • 2.3 Upgrade Netris Controller
      • 3. Steps to Upgrade the Local Netris Repository
  • Network Switch Initial Setup
    • Nvidia Cumulus v5.9+ Switch Initial Setup
    • Nvidia Cumulus v5 Switch Initial Setup
    • Ubuntu SwitchDev Switch Initial Setup
    • EdgeCore SONiC Switch Initial Setup
    • Dell SONiC Switch Initial Setup
    • Nvidia Cumulus v3.7 Switch Initial Setup
  • SoftGate HS Installation
    • Minimum Hardware Requirements
    • Provision Netris SoftGate software
  • SoftGate Installation
    • Minimum Hardware Requirements
    • Provision Netris SoftGate software
  • SoftGate PRO Installation
    • Minimum Hardware Requirements
    • BIOS Configuration
    • Install the Netris Agent

Miscellaneous

  • SoftGate Performance
  • Learn Netris Operations with Kubernetes
    • Intro
    • Install Netris Operator
    • Deploy an Application with an On-Demand Netris Load Balancer
    • Using Netris Custom Resources
      • Introduction to Netris Custom Resources
      • L4LB Custom Resource
      • V-Net Custom Resource
      • BGP Custom Resource
      • Importing Existing Resources from Netris Controller to Kubernetes
      • Reclaim Policy
    • Netris Calico CNI Integration
      • Disabling Netris-Calico Integration
Netris docs
  • »
  • Link Aggregation (LAG)
  • Edit on GitHub
Next Previous

Link Aggregation (LAG)

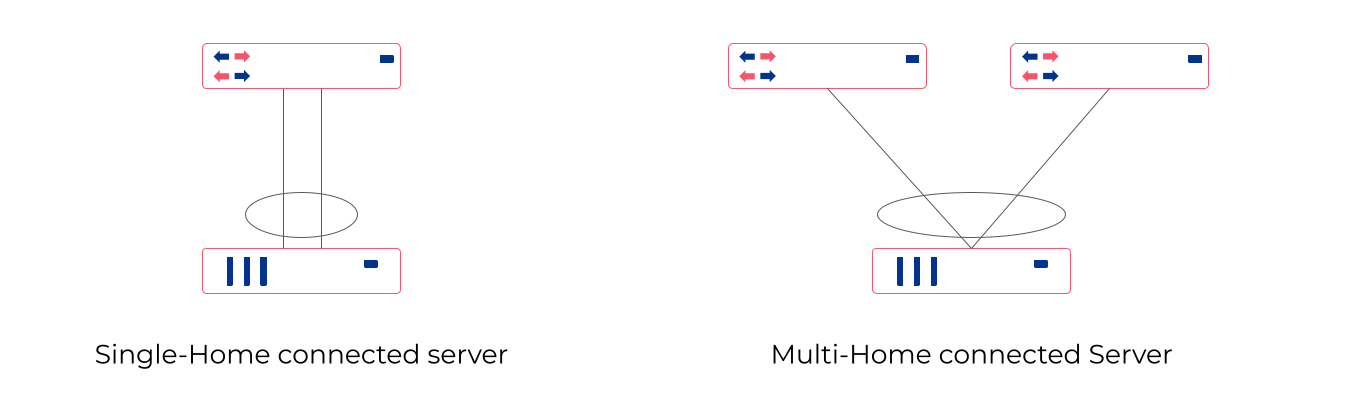
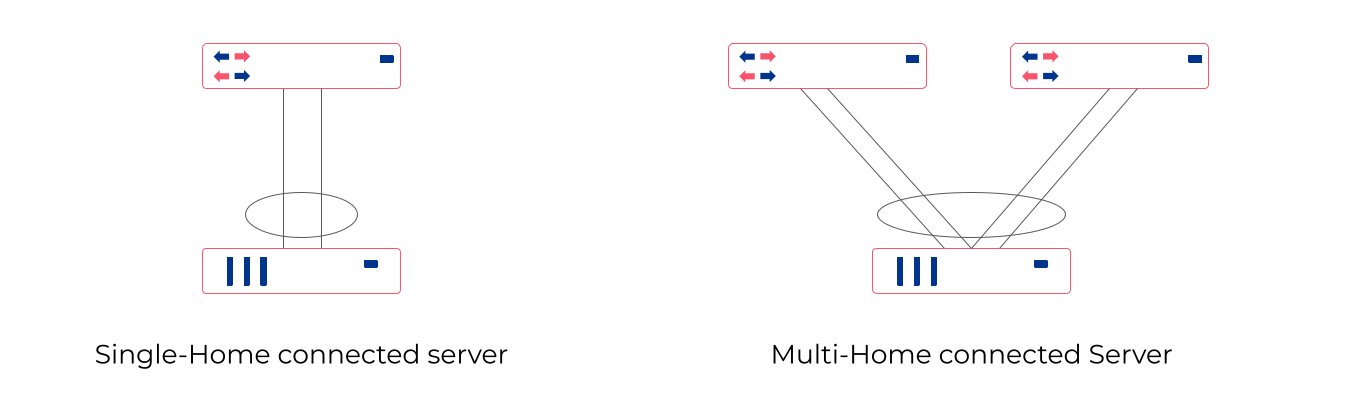
Link Aggregation (LAG), also known as link bundling, Ethernet/network/NIC bonding, or port teaming, is a method of combining (aggregating) multiple network connections in parallel to increase throughput beyond what a single connection could sustain and to provide redundancy in case one of the links fails.

LAG diagram

The Link Aggregation Control Protocol (LACP) is a key component of LAG. It’s a protocol for the collective handling of multiple physical ports that can be seen as a single channel for network traffic.

Netris supports Automatic and Custom modes of configuring LAGs, each described below.

Automatic LAG with EVPN Multi-homing

If LACP is configured on the server side, then Netris will automatically identify the corresponding switch port pairs and form a LAG with EVPN Multihoming enabled for any switch ports participating in a V-Net service.

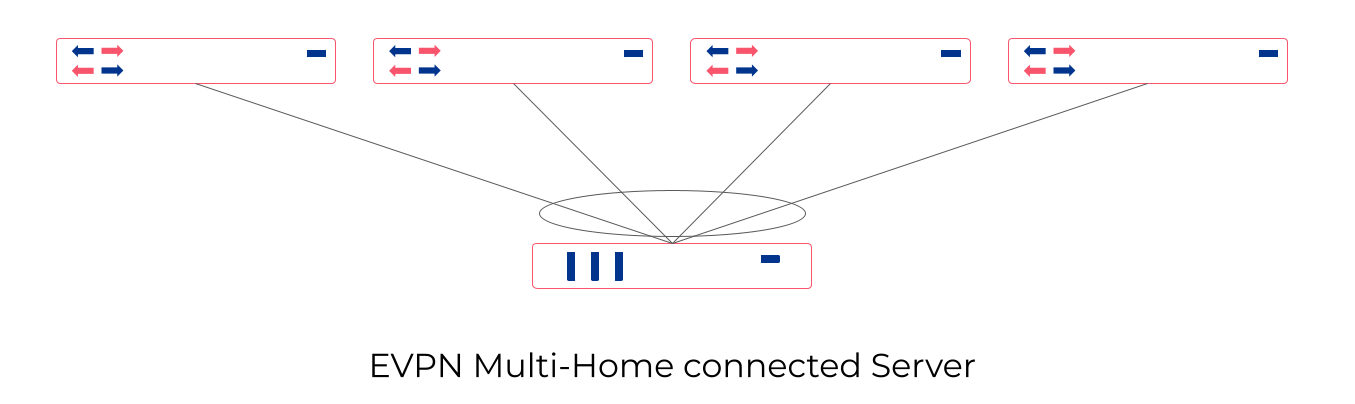
EVPN Multi-Homing (EVPN-MH) offers robust support for an all-active redundancy model for servers. This means that all connections from a server to multiple switches are concurrently active and operational, ensuring high availability, load balancing, and seamless failover capabilities. As a result, EVPN-MH enhances network resilience and continuity of service.

EVPN-MH diagram

Note: Active Active Multi-homing is currently limited to:

  • Switch OS Cumulus 5.3 or higher.

  • Netris 4.0 or higher.

  • One port per switch (can be overcome in Custom LAG).

  • Only two switches in EVPN-MH domain with ASIC Spectrum A1.

When you add switch ports to a V-Net service, Netris agents automatically configure LAG and apply LACP with EVPN-MH and LACP fallback. If Active-Active Multi Homing is not supported on your hardware, Active-Standby LACP LAG will be configured.

Both in Active-Active and Active-Standby cases LACP should be configured on the server side. If the server does not have LACP configured, the LAG will fallback into non LACP mode and one of two links will still remain active.

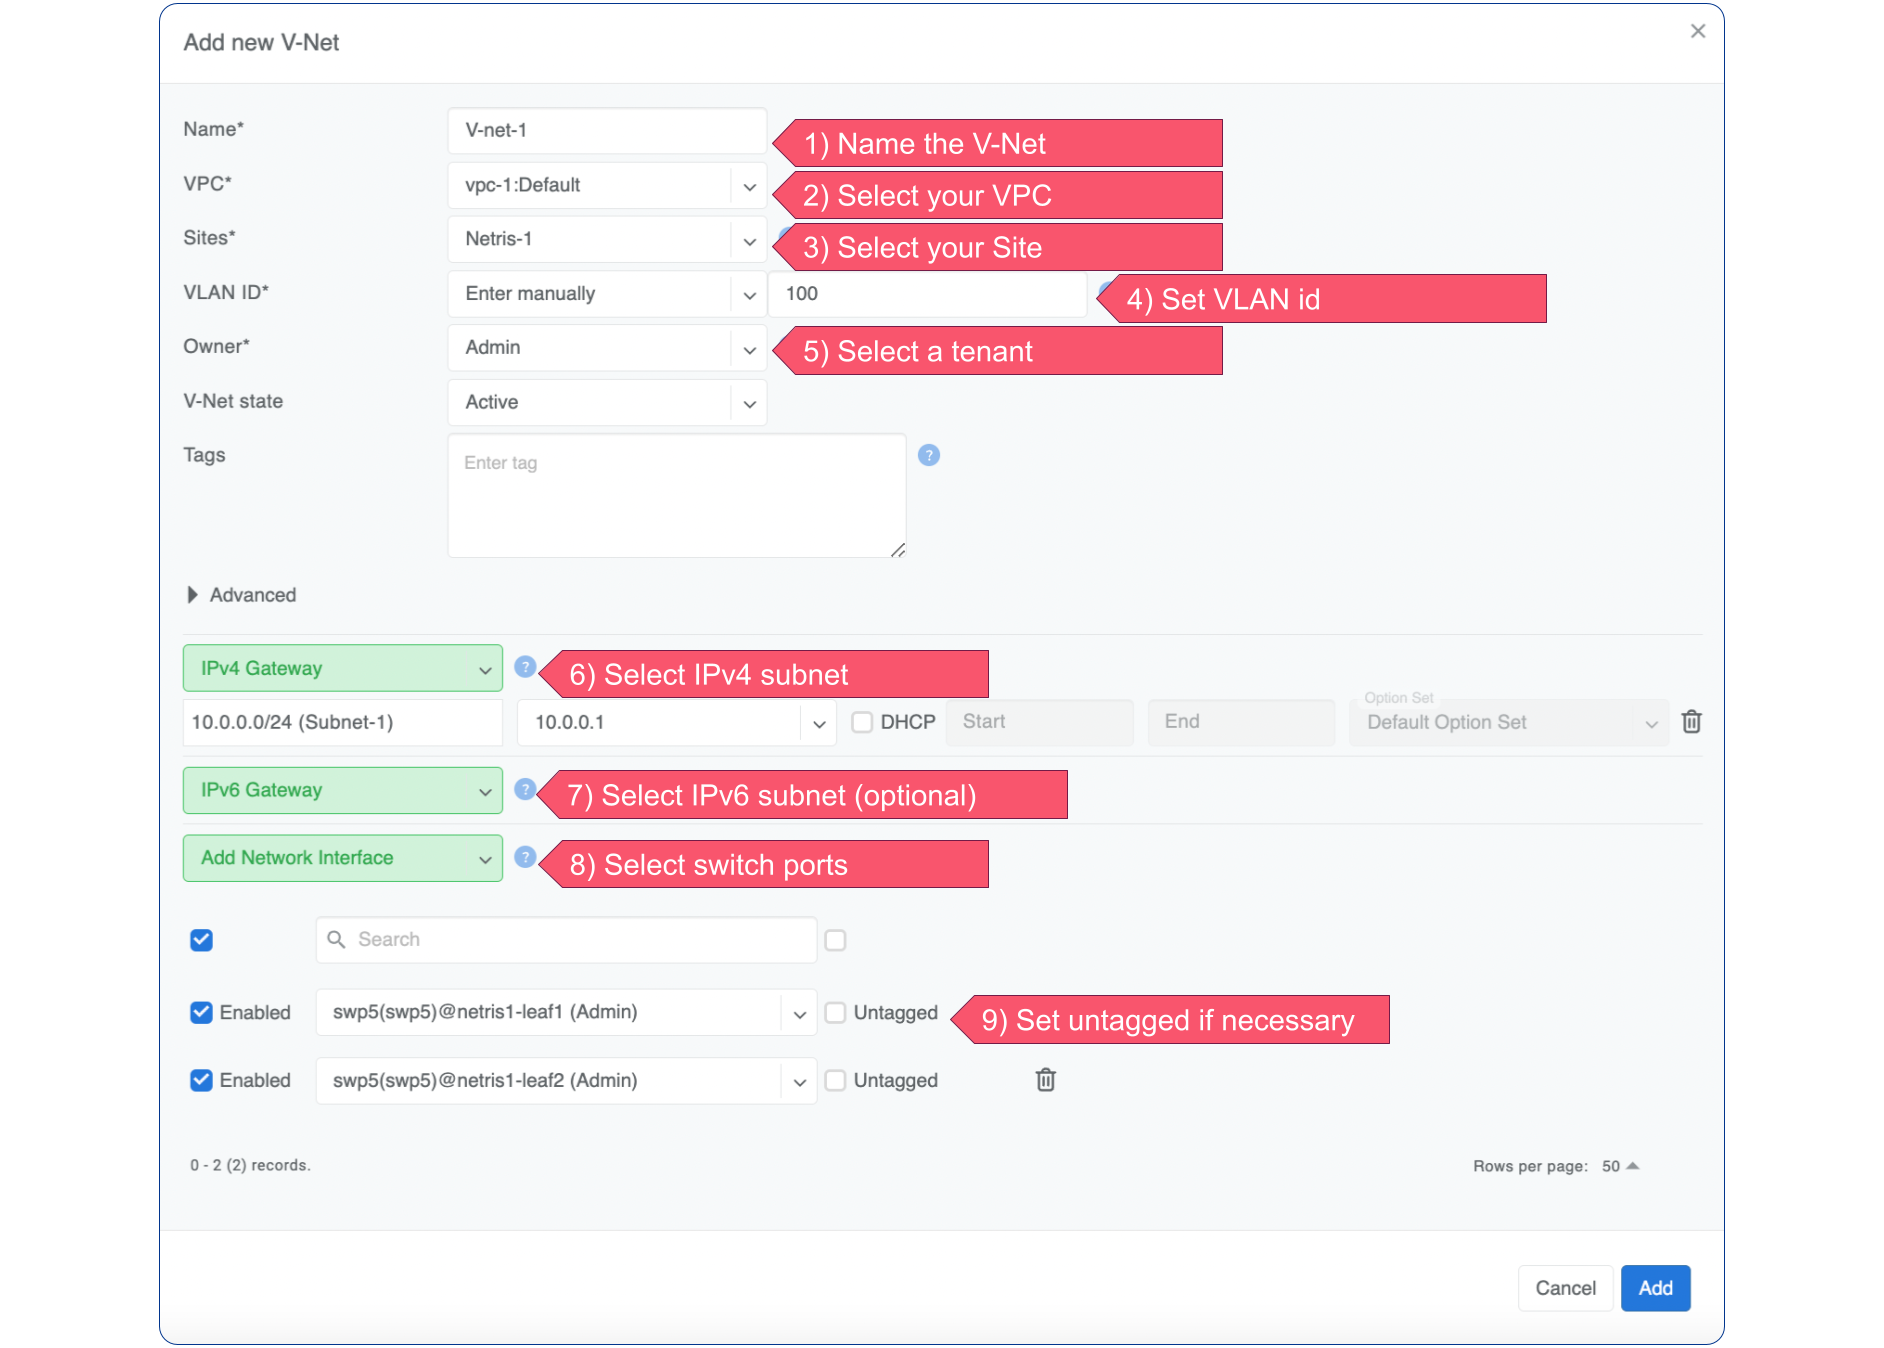
To create a V-Net with EVPN-MH go to Service → V-Net → +Add

Add LAG to V-Net

Custom LAG

There are several use cases when you may need a Custom (manually configured) LAG.

  • Aggregate more than one port per each switch (with or without EVPN).

  • LACP fallback is not sufficient and needs to be unconditionally disabled on the switch side. EVPN-MH will be deactivated in this case.

Custom LAG diagram

Please note that a Custom LAG can only be created with one switch. However, if you add two or more Custom LAGs to a V-Net, EVPN-MH will be automatically activated.

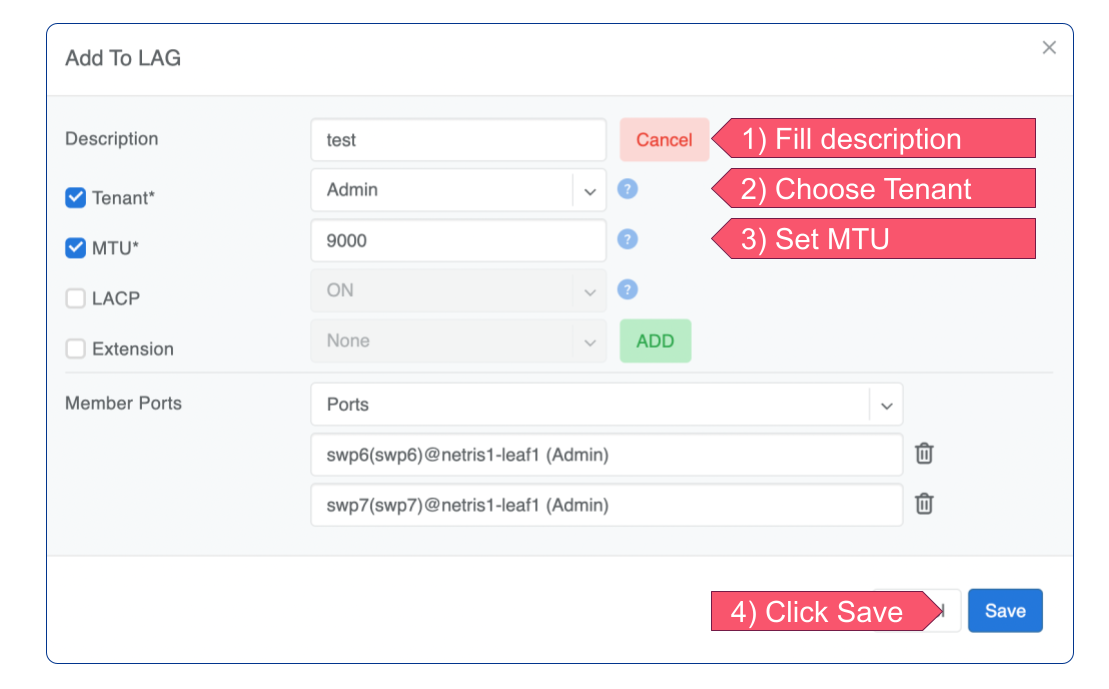
To create a Custom LAG go to Network → Network Interfaces.
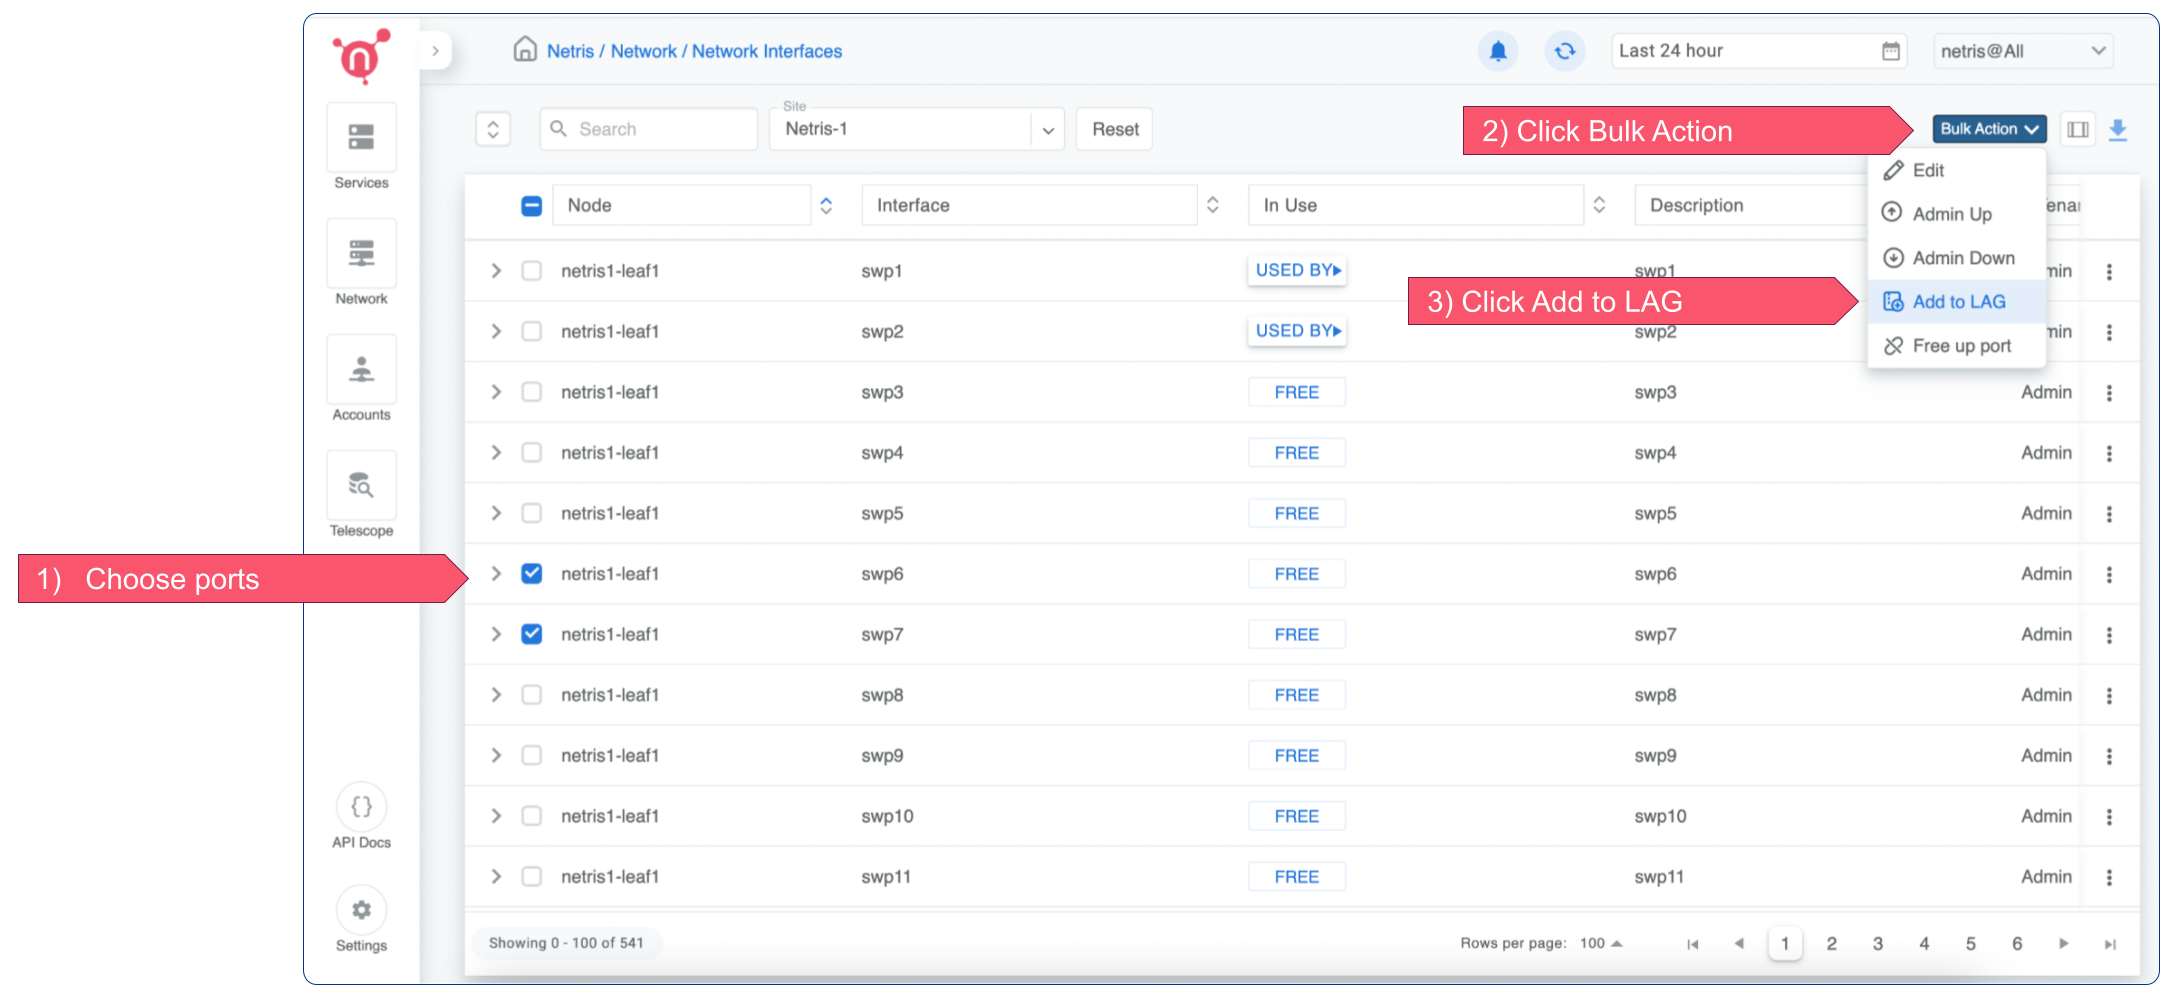
Add Custom LAG

Add a new LAG.

Add Custom LAG

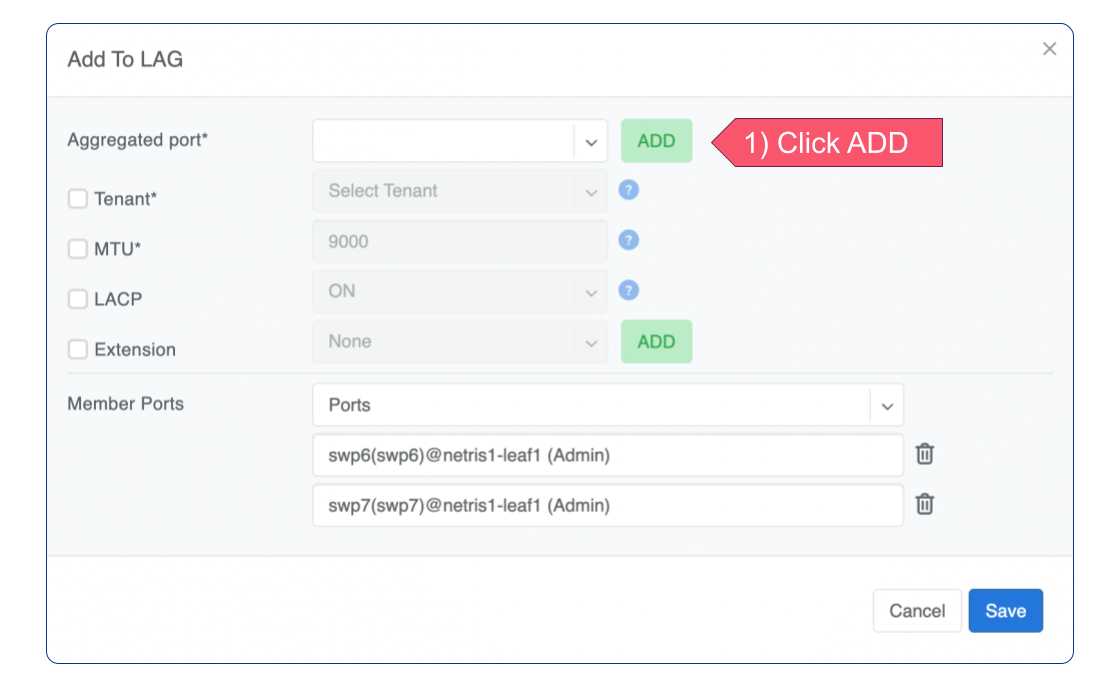
Set necessary options.

Add Custom LAG
Next Previous

© Copyright 2025, Netris.

Built with Sphinx using a theme provided by Read the Docs.
Alternate Versions v: latest
Versions
2.9
3.0
3.4
asaroyan-patch-1
latest
Downloads
pdf
epub

Free theme by Read the Docs.