 Join Slack
NVIDIA UFM (InfiniBand) Integration Plugin for Netris Controller
Overview
The Netris-UFM plugin provides seamless integration between Netris Controller and NVIDIA UFM (Unified Fabric Manager) for AI infrastructures with hybrid InfiniBand and Ethernet networks. This integration allows infrastructure operators to define compute multi-tenancy in a single place through Netris, significantly simplifying management across both network types.
Key Benefits
Unified Management Interface: Define tenant isolation by simply listing servers in a server-cluster object
Automated Provisioning: Automatically configure both Ethernet (via Netris) and InfiniBand (via UFM) networks
Simplified Operations: Eliminate the need to manage SwitchPorts, VLANs, VRFs on Ethernet and GUIDs, PKeys, SHARP groups on InfiniBand separately
Architecture
The Netris-UFM plugin acts as the integration layer between Netris Controller and NVIDIA UFM:
Netris Controller: Orchestrates the Ethernet switches and provides the primary user interface
NVIDIA UFM: Manages the InfiniBand switches and provides specialized InfiniBand functionality
Netris-UFM Plugin: Synchronizes configurations between both systems
When you define a server-cluster in Netris, the plugin automatically:
Discovers InfiniBand port GUIDs from UFM
Creates and manages appropriate PKeys in UFM
Optionally sets up SHARP reservations for high-performance operations
Netris interacts with UFM exclusively through UFM’s REST API, where it creates and maintains PKeys, GUID membership including the index0 attribute, and SHARP reservations.
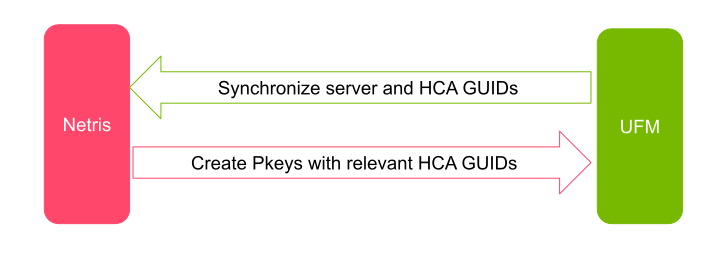
Figure: Netris-UFM Integration Workflow
Prerequisites
Before installing the Netris-UFM plugin, ensure:
A functioning Netris Controller environment
A properly configured NVIDIA UFM installation with limited membership enabled (see below)
Network connectivity between both systems
Appropriate access credentials for both platforms
UFM Configuration Requirements
To enable the UFM PKey REST API functionality required by the Netris-UFM integration, you must configure UFM to use limited membership by default.
Configure gv.cfg
Edit the UFM configuration file /opt/ufm/files/conf/gv.cfg and add or modify the following section:
[MngNetwork]
default_membership = limited
Restart UFM Service
After making this configuration change, restart the UFM enterprise service:
systemctl restart ufm-enterprise
Important
This UFM configuration change is essential for the Netris-UFM integration to function properly. The setting enables limited membership by default, which allows servers on the subnet to communicate only when they have full membership in non-default partitions managed by the Netris-UFM plugin.
Installation
The Netris-UFM plugin manifest ships inside the same air-gapped installation tarball used to deploy the Netris Controller — no internet access is required. The steps below assume you unpacked that tarball into ~/netris-controller-ha/ (see Installing HA Netris Controller in Air-Gapped Environments for details).
Edit
netris-controller-ha/manifests/netris-controller/ufm.yamlto update the secret values based on your environment:apiVersion: v1 kind: Secret metadata: name: netris-controller-nvidia-ufm-agent-envs namespace: netris-controller type: Opaque stringData: NETRIS_CONTROLLER_ADDR: "https://netris.example.com" NETRIS_CONTROLLER_LOGIN: "netris" NETRIS_CONTROLLER_PASSWORD: "Password!" NETRIS_VERIFY_SSL: "true" NETRIS_SITE_NAME: "Site" UFM_ADDR: "https://ufm.example.com" UFM_LOGIN: "admin" UFM_PASSWORD: "123456" UFM_VERIFY_SSL: "false" UFM_ID: "ufm-88" UFM_PKEY_RANGE: "100-7ffe" UFM_ENABLE_SHARP: "true"
Apply the configuration to your Kubernetes cluster:
kubectl apply -f netris-controller-ha/manifests/netris-controller/ufm.yaml
Upgrading the UFM Integration
When you upgrade an existing Netris deployment, Netris recommends setting the netris-controller-nvidia-ufm-agent replicas to 0, which effectively disables the UFM integration, then following the normal Netris upgrade procedure (see Installing HA Netris Controller in Air-Gapped Environments).
To set the replicas to 0:
kubectl -nnetris-controller scale deploy netris-controller-nvidia-ufm-agent --replicas=0
To upgrade the plugin, simply apply the updated ufm.yaml manifest.
Tip
Remember to populate the updated ufm.yaml manifest file with the current netris credentials as shown in the installation section above.
Multiple UFM Instances
If a customer’s InfiniBand environment has more than one fabric — each with its own UFM (for example, separate compute and storage fabrics) — deploy a separate Netris-UFM agent per UFM. A highly available UFM pair presents a single address to Netris and is served by one agent.
Copy
ufm.yamlto a new file name.In the copy, give the agent a unique Kubernetes resource name (
metadata.name),UFM_ADDR, and a uniqueUFM_ID, and update the other UFM/Netris connection values as needed.
Tip
Here is a quick way to update the YAML file for the 2nd UFM instance:
cp ufm.yaml ufm-storage.yaml
sed -i 's/netris-controller-nvidia-ufm-agent/netris-controller-nvidia-ufm-agent-storage/g' ufm-storage.yaml
Apply the copy with
kubectl apply -f.
Important
Re-applying a manifest with the same metadata.name updates the existing agent rather than creating a second one. Each UFM instance needs its own uniquely-named deployment and a unique UFM_ID.
Configuration Parameters
Netris Controller Configuration
Parameter |
Description |
Example |
|---|---|---|
NETRIS_CONTROLLER_ADDR |
The URL of your Netris Controller |
|
NETRIS_CONTROLLER_LOGIN |
Username for authenticating with Netris Controller |
ufm_integration_account |
NETRIS_CONTROLLER_PASSWORD |
Password for authenticating with Netris Controller |
Password! |
NETRIS_VERIFY_SSL |
Whether to verify SSL certificates when connecting to Netris Controller |
true or false |
NETRIS_SITE_NAME |
The name of the site in Netris Controller to manage |
Datacenter-1 |
NVIDIA UFM Configuration
Parameter |
Description |
Example |
|---|---|---|
UFM_ADDR |
The URL of your NVIDIA UFM server |
|
UFM_LOGIN |
Username for authenticating with UFM |
admin |
UFM_PASSWORD |
Password for authenticating with UFM |
123456 |
UFM_VERIFY_SSL |
Whether to verify SSL certificates when connecting to UFM |
true or false |
UFM_ID |
Unique identifier for this UFM instance, referenced from the |
ufm-88 |
UFM_PKEY_RANGE |
Range of PKey IDs that can be allocated to clusters, in hexadecimal format |
100-7ffe |
UFM_ENABLE_SHARP |
Whether to enable SHARP reservation management for clusters |
true or false |
Before assigning a PKey from UFM_PKEY_RANGE, the agent always checks whether that PKey already exists in UFM, and will not overwrite an existing PKey. If a customer already has PKeys configured manually and wants to preserve them, set UFM_PKEY_RANGE to start above their existing range (e.g., start at 200 instead of 100) to avoid collisions.
Agent Configuration
Parameter |
Description |
Default |
Example |
|---|---|---|---|
LOG_LEVEL |
Logging level for the agent |
info |
info or debug |
RECONCILE_INTERVAL |
Interval in seconds between reconciliation operations |
10 |
10 |
Starting in Netris Controller 4.11, the Reconcile Interval can also be set from the UI (Settings → General). When that field is present, it takes precedence over RECONCILE_INTERVAL in the YAML/env file; the YAML/env value is used only as a fallback on controllers predating 4.11.
Usage Guide
After successfully installing and configuring the Netris-UFM agent, follow these steps to set up and use the integration:
1. Server Configuration in Netris
The first step is to create servers in the Netris Controller inventory that match exactly with the servers in UFM:
In Netris Controller, navigate to Network → Topology → +Add.
Create servers with identical names as they appear in UFM (this is crucial for proper GUID mapping)
Once created, the Netris-UFM agent will automatically sync the InfiniBand host and HCA GUIDs from UFM into Netris
Important
Server names must match exactly between UFM and Netris Controller for the initial sync to complete properly. Once the initial sync is done and the hosting_system_guid field is populated in Netris inventory, the plugin will continue to maintain the mapping even if server names change in Netris or UFM. You can verify the GUID mapping in Netris Controller UI under Network → Inventory by examining the Custom field of the server object. It should show both the HCA GUIDs and the hosting system GUID.
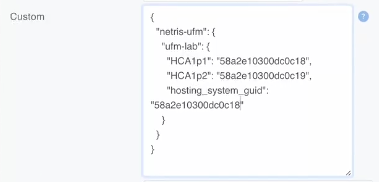
Figure: Server Custom field showing GUIDs
hosting_system_guid always corresponds to the GUID of the server’s first HCA. You can cross-check this value in the UFM UI under the server’s Device view, which displays one general GUID that should match. See “Replacing HCAs and Servers” below for what to do when hardware is replaced or the mapping is lost.
Note
The server’s Custom field may also show GPU UID entries. Those come from the separate NVLink integration and are unrelated to UFM — the Netris-UFM plugin doesn’t read or write them.
2. Create a Server Cluster Template
Next, create a Server Cluster Template.
Navigate to Services → Server Cluster Template.
Click Add to create a new template
Configure the template using JSON with specific sections for different network fabrics. Use Infiniband Fabric Example.
Note
Netris Controller has no visibility into individual UFM NICs or ports, so the InfiniBand side of the template is just a single generic netris-ufm fabric entry — you don’t (and can’t) enumerate individual HCAs the way you would for Ethernet interfaces. Per-host HCA/port mapping happens automatically via the GUID sync described above.
3. Create Server Clusters
After setting up the template, create server clusters as described in Creating Server Cluster.
4. Verification
Once the server cluster is created:
The Netris-UFM agent will automatically:
Identify the InfiniBand GUIDs associated with the servers in the cluster
Provision appropriate PKeys in UFM
Create necessary SHARP reservations if applicable (if UFM_ENABLE_SHARP is set to true)
Verify the configuration:
Check the Netris Controller UI for successful cluster creation
Examine the UFM UI to confirm PKey assignments
Test connectivity between servers in the cluster via InfiniBand
In the UFM UI, open the PKey and confirm the
index0value of each GUID matches whether that server is a dedicated or shared member
5. Monitoring Integration Status
To monitor the status of the integration:
Check the Netris-UFM agent logs (as described in the Monitoring section)
Verify the synchronization state:
kubectl logs -f deployment/netris-controller-nvidia-ufm-agent -n netris-controller
Replacing HCAs and Servers
Renamed server, no hardware change — if a server is renamed in Netris or in UFM after the initial sync, the mapping is preserved automatically via
hosting_system_guid. No action needed.Non-primary HCA replacement (any HCA other than the first) — no action needed. UFM keeps reporting the existing
hosting_system_guid(inherited from the primary HCA), and the Netris-UFM agent automatically syncs the replaced HCA’s GUIDs into the existing mapping.Primary HCA replacement (the HCA
hosting_system_guidis derived from) — UFM assigns the server a newhosting_system_guid, so this requires manual intervention. Use one of:Delete the
hosting_system_guidkey/value from the server’s Custom JSON in Netris and let the Netris-UFM agent repopulate it. Reminder: server object name in Netris must match the server name in UFM — rename either side first if they’ve drifted apart.Or manually set
hosting_system_guidin the Custom JSON to the new value.
Full server replacement (1:1 swap, re-onboarded into the cluster as a new system) — the same two options as primary HCA replacement apply. As long as the replacement is onboarded under the same name it had in UFM, Netris discovers it as a new system and repopulates the HCA GUID mappings automatically; the old mapping does not cause a conflict.
Functional Workflow
Discovery Phase:
Plugin connects to both Netris Controller and NVIDIA UFM
InfiniBand port GUIDs are discovered from UFM and stored in Netris inventory
Cluster Creation:
When a server cluster is created or modified in Netris Controller
Plugin identifies affected servers and their InfiniBand GUIDs
Appropriate PKeys are automatically provisioned in UFM
SHARP Integration:
For high-performance network operations, SHARP reservations are created if UFM_ENABLE_SHARP is set to true
These correspond to the server clusters defined in Netris
Continuous Reconciliation:
Plugin periodically synchronizes between Netris and UFM
Ensures consistency between Ethernet and InfiniBand configurations
Reconciliation interval is configurable (default: 10 seconds)
InfiniBand Security (Recommended)
What is MKey Protection?
MKey (Management Key) is InfiniBand’s security mechanism that protects fabric devices from unauthorized management access. When enabled, only tools and managers with the correct MKey can perform configuration operations on switches and HCAs. We strongly recommend enabling MKey protection in production environments to prevent unauthorized fabric management operations and protect against rogue management tools.
Impact on Netris Integration
MKey protection has no impact on the Netris-UFM integration. The Netris-UFM plugin communicates exclusively through UFM’s REST API, and UFM (as the authorized Subnet Manager) handles all MKey authentication with fabric devices internally.
Configuration Steps
To enable MKey protection in UFM:
1. Set the MKey Value
Edit /opt/ufm/files/conf/gv.cfg and in the [SubnetManager] section, set a non-zero value (e.g., 0x2 or any 64-bit hex value):
global_m_key_seed = 0x0000000000000002
2. Enable MKey Protection Level
Edit /opt/ufm/files/conf/opensm/opensm.conf and set:
m_key_protection_level 2
Protection levels:
0: No protection (MKey set but not enforced)1: Basic protection (prevents unauthorized Set operations)2: Full protection (prevents unauthorized Get and Set operations) ← Recommended
3. Enable VSKey (Vendor Specific Key)
VSKey provides security for NVIDIA/Mellanox vendor-specific operations that go beyond standard InfiniBand management.
To configure it edit /opt/ufm/files/conf/opensm/opensm.conf and set:
vs_key_enable 2
vs_key_lease_period = 60
vs_key_ci_protect_bits = 1
key_mgr_seed = 0x0000000000000000
VSKey Configuration Parameters:
vs_key_enable:0– Ignore: No VS key configuration1– Disable: Ports set with zero values (no protection)2– Enable: Each port configured with unique VS Key ← Recommended
vs_key_ci_protect_bits: Protection level0– Key is protected but readable via KeyInfo GET1– Full protection; all VS MADs must have correct key ← Recommended
vs_key_lease_period: Duration in seconds before key expires (60recommended)key_mgr_seed: Set to0to use MKey as seed for VS keys
4. Restart UFM Service
systemctl restart ufm-enterprise.service
5. Verification
Verify MKey and protection level are applied:
cat /opt/ufm/files/conf/opensm/opensm.conf | grep -E "^m_key|^m_key_protection_level|^vs_key_enable"
Should show:
m_key 0x0000000000000002
m_key_protection_level 2
vs_key_enable 2
Test protection by querying a fabric device:
# Without MKey - should timeout/fail
sudo smpquery portinfo <lid> 1

# With correct MKey - should succeed
sudo smpquery --m_key 0x2 portinfo <lid> 1
Note
Once MKey is enabled, diagnostic tools like ibdiagnet will need the --m_key parameter to access fabric devices. UFM itself continues to function normally as it manages the MKey internally.
Monitoring and Troubleshooting
Viewing Logs
kubectl logs -f deployment/netris-controller-nvidia-ufm-agent -n netris-controller
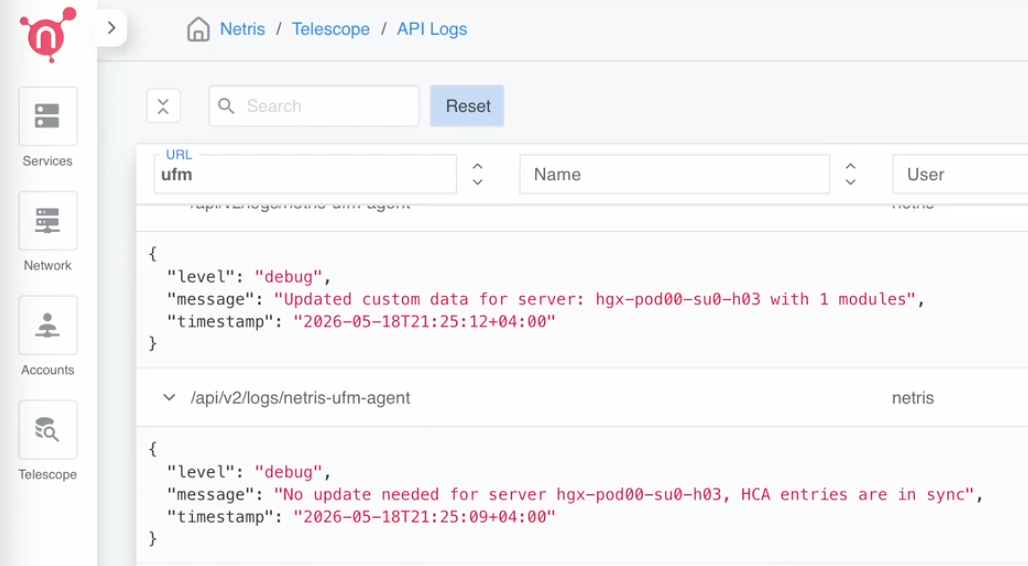
Figure: Viewing UFM integration logs in Netris Controller UI
Common Issues and Solutions
Connection Issues to Netris Controller or UFM
Symptoms:
Log messages indicating connection timeouts or authentication failures
Missing data in Netris inventory
Solutions:
Verify network connectivity between the plugin and both systems:
ping netris.example.com
ping ufm.example.com
Check credentials in the configuration:
Verify username/password combinations for both systems
Ensure API permissions are sufficient
Verify SSL certificate settings:
If using self-signed certificates, set NETRIS_VERIFY_SSL/UFM_VERIFY_SSL to “false”
For production, use valid certificates and set verification to “true”
Certificates typically expire within one year (sometimes two); plan for rotation. When a certificate expires or becomes invalid, Netris logs a connection failure in the agent logs.
Note on log behavior: The agent logs an entry only when it takes an action or encounters an error. A reconciliation cycle that completes normally and finds nothing to change does not produce a log message — so no new log entries is the expected, healthy state, not a sign that something has stalled.
If connectivity to UFM goes down, you will see a new timeout message every reconcile interval (every 10 seconds by default) for as long as the outage lasts. Once connectivity is restored, those timeout messages stop, and no separate “connection restored” message is logged in their place. So a timeout logged hours ago with nothing since typically means connectivity was restored, not that the integration is still down.
PKey Assignment Issues
Symptoms:
Server clusters don’t have proper isolation in InfiniBand
Errors about PKey allocation failures in logs
Solutions:
Ensure the UFM_PKEY_RANGE has sufficient available IDs:
Check current PKey usage in UFM
Adjust the range if needed
Verify server naming consistency:
Server names must match exactly between Netris and UFM
Check for any server name discrepancies
Examine the PKey allocation process in debug logs:
kubectl logs -f deployment/netris-controller-nvidia-ufm-agent -n netris-controller | grep "PKey"
Synchronization Delays
Symptoms:
Changes in Netris don’t appear quickly in UFM
Inconsistent behavior after making configuration changes
Solutions:
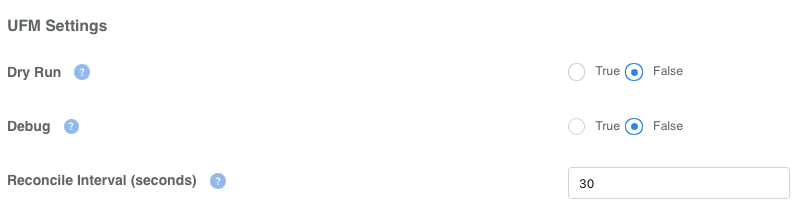
Turn on debug logging in Settings>General to monitor synchronization operations in detail. Tail the logs once turned on. See Viewing Logs for instructions on viewing logs.
Adjust the Reconcile Interval Settings>General to a shorter time period for faster synchronization. Tail the logs once turned on. See Viewing Logs for instructions on viewing logs.
Use Dry Run mode (Settings → General) to test changes without applying them. This is particularly useful in two situations: (a) the agent was disabled for a while, and Netris and UFM have drifted apart from manual changes made on both sides, so you want to preview what enabling it would do before actually re-enabling it; and (b) your change-management process requires reviewing planned changes before they’re applied — Dry Run lets you generate that preview for approval. Tail the logs once turned on. See Viewing Logs for instructions on viewing logs.
Check for high CPU or memory usage on the plugin host
Verify network latency between the plugin and both systems
Restart the plugin service if synchronization issues persist:
kubectl rollout restart deployment/netris-controller-nvidia-ufm-agent -n netris-controller
Checking PKey/GUID membership: To see which GUIDs belong to a given server cluster’s PKey, use the Netris API (v2) PKey Ledger endpoint for the netris-ufm integration. Useful when troubleshooting cluster membership that doesn’t match expectations.
Version Compatibility
Netris Controller Version |
NVIDIA UFM Version |
Plugin Version |
|---|---|---|
4.4.1+ |
6.15.4+ |
0.3.0+ |
Getting Started Guide
Quick Setup Example
Install the plugin as described above
Verify the plugin is running properly:
kubectl get pods -n netris-controller | grep ufm
Create a Server Cluster Template in Netris Controller UI or API
Create Server Cluster with the servers that have InfiniBand connections
Verify PKey assignments in UFM:
Check the UFM UI for PKey assignments
Verify servers in the cluster can communicate via InfiniBand