Logo slack_icon Join Slack
NVIDIA NMX-C (NVLink) Integration Plugin for Netris Controller — Netris Documentation

General Information

  • Definitions
  • Introduction to Netris
  • Netris Supported Functionality & Platforms Matrix
    • Switch Fabric Management Functions
    • Monitoring & Telemetry
    • External Routing Functions
    • Cloud Networking Functions & Constructs
    • Overlay Network Functions
    • AI Specific Functions
    • Compute Platform Integrations
    • Security
    • Netris Controller Administration
    • Management Interfaces
    • Host Networking
  • Netris and NOS versions compatibility matrix
  • Hardware Requirements
    • Netris Controller
    • Netris SoftGate HS (Multi-VPC version)
  • Supported Switch Hardware
    • Nvidia
    • Dell
    • EdgeCore
    • Arista
  • Netris Architecture
    • Netris Controller
    • Netris Switch Agent
    • Netris SoftGate

Try & Learn Netris

  • Netris Try & Learn
    • Netris Infrastructure Simulation Platform
    • Netris Test Controller & Infrastructure Simulation
      • Web Console
      • SSH
      • Netris Init Modules
      • Start/Stop a Simulation
    • Lab Scenario: GPU-as-a-Service network with NVIDIA Spectrum-X architecture
      • Initialize the Netris controller
      • Start a simulation
      • Monitoring Dashboard
      • Topology
      • SSH to Switches
      • SSH to GPU servers
      • NHN (Netris host networking plugin)
      • Server Cluster Template
      • Server Cluster
      • Checking the connectivity
      • Cleanup the Controller

Detailed Installation

  • Controller Installation
    • Installing HA Netris Controller in Air-Gapped Environments
      • Why Air-Gapped Installation?
      • Why a High Availability (HA) Cluster?
      • Prerequisites
      • Obtain the Installation File
      • Steps to Install
        • 1. Preparing Each Node
        • 2. Install K3s on All Nodes
        • 3. Import Necessary Container Images
        • 4. Configure kube-vip for KubeAPI High Availability
        • 5. Add Helm Chart Packages to K3s
        • 6. Verify and Scale Core K3s Components
        • 7. Deploy Kube-VIP Cloud Controller
        • 8. Install Traefik Proxy
        • 9. Deploy the Netris Controller
        • 10. (Optional) Enable SSL with cert-manager
        • 11. Set Up the Local Netris Repository
        • 12. Validate Your Deployment
      • After Installation
      • How to consume local repository
    • Upgrading HA Netris Controller in Air-Gapped Environments
      • Obtain the Upgrade File
      • 1. Preparing Each Node
        • 1.1 Transfer the File to the Servers
        • 1.2 Extract the Tarball
        • 1.3 Navigate to the Installation Directory
      • 2. Steps to Upgrade Controller
        • 2.1 Import Necessary Container Images
        • 2.2 Add Helm Chart Packages Upgrades to K3s
        • 2.3 Database backup
        • 2.4 Upgrade Netris Controller
      • 3. Steps to Upgrade the Local Netris Repository
    • Maintenance Procedures
      • Node Maintenance Best Practices
        • Individual Node Maintenance (Recommended Approach)
        • Full Cluster Maintenance (When All Nodes Need Simultaneous Maintenance)
      • Verifying MariaDB Cluster Health
      • Maintenance Best Practices
    • Helm Chart Installation
      • Requirements
      • Get Repo Info
      • Installing the Chart
      • Uninstalling the Chart
      • Chart Configuration
    • Netris Local Repository Setup
      • When & Why to Use the Local Repository?
      • How to Enable the Local Repository on the Netris Controller?
      • How to consume local repository
      • Upgrade Local-Repo Cache
  • Network Switch Initial Setup
    • Nvidia Cumulus v5.9+ Switch Initial Setup
    • Nvidia Cumulus v5 Switch Initial Setup
    • Ubuntu SwitchDev Switch Initial Setup
    • EdgeCore SONiC Switch Initial Setup
    • Dell SONiC Switch Initial Setup
    • Nvidia Cumulus v3.7 Switch Initial Setup
  • SoftGate HS
    • Overview
      • Services Provided by SoftGate
      • What SoftGate does not do
      • Hardware Requirements
    • Performance
    • Architecture Overview
      • SoftGate physical connectivity
      • SoftGate logical connectivity
      • SoftGate node Control Plane
      • SoftGate node Data Plane
      • SoftGate Roles and Flavors
    • Installation and Initial Deployment
      • Prerequisites
      • Installation Guide
    • Upstream/Border Routers (EBGP)
      • Configuring upstream BGP
      • BGP route exchange between SoftGates, upstream routers, and downstream switches
    • High Availability and Load Distribution
      • Netris VPC originated traffic routing
      • Internet originated traffic routing
      • Failover behavior
    • Observability and Operations

Fabric Management

  • Inventory
    • Adding Switches
    • Adding SoftGates
  • Topology Manager
    • Adding Links
  • VPC
    • Adding new VPC
  • IP Address Management
    • Allocations and Subnets
    • IPAM Tree View
    • Add an Allocation
    • Add a Subnet
  • Basic BGP
    • Adding BGP Peers
  • Advanced BGP
    • BGP Objects
      • IPv4 Prefix
      • IPv6 Prefix
      • Community
    • BGP route-maps
    • eBGP Importing Non-Default Routes into a VPC
      • How to Import Non-Default Prefixes
  • Static Routing
  • NAT
    • Enabling NAT
    • Defining NAT rules
  • Looking Glass
  • VPC Peering
  • Switch Ports
  • Link Aggregation (LAG)
    • Automatic LAG with EVPN Multi-homing
    • Custom LAG
  • Graph Boards
    • Graph Boards
    • API Logs
    • Dashboard
  • Maintenance Mode
    • Overview
    • Maintenance Mode for Softgate - What’s happening behind the scenes?
    • Maintenance Mode for Switch - What’s happening behind the scenes?
  • Upgrade and Rollback
    • Netris upgrade Procedure
      • Backup current database
      • Stop Netris Agents
      • Check your current version
      • Upgrade the Controller
      • Check the upgraded version
      • Upgrade Switches and SoftGate nodes
    • Rollback Procedure
      • Stop Netris Agents
      • Restore The Database
      • Downgrade the Controller Software
      • Downgrade Netris Agent Software

Services

  • V-Net
    • Introduction
    • L2VPN V-Nets
      • DHCP
      • DHCP Relay
        • Example:
      • V-Net Fields explained
      • Advanced V-Net Fields explained
      • Multisite V-Nets
      • Link Aggregation and Multihoming
        • Ethernet VPN Multi-Homing (EVPN-MH)
        • MC-LAG
      • Labels
        • How labels work
        • Rules and limits
        • When to use labels
    • L3VPN
      • Creating an L3VPN V-Net
      • Rules and limits
    • Verification Tools
      • UI Tools
  • Server Cluster
    • Introduction
    • Server Cluster Template
      • Server Cluster Template Examples:
        • Ethernet-only Fabric Example
        • Infiniband Fabric Example
        • NVLink (NVL72 or NVL144) Fabric Example
        • IPv6 Example
      • Template Fields Explained:
      • Adding a Server Cluster Template
      • Advanced Uses
        • Non-overlapping subnets
        • Specify gateway
    • Creating Server Cluster
      • Adding a Server Cluster
      • Shared Endpoints
        • Untagged VLAN on Shared Endpoints
      • Server Cluster Fields Explained:
  • L4 Load Balancer (L4LB)
    • Enabling L4LB service
    • Consuming L4LB service
  • Access Control Lists (ACL)
    • ACL Default Policy
    • ACL Rules
    • ACL Approval Workflow
    • ACL Processing Order

Netris Integrations

  • NVIDIA UFM (InfiniBand) Integration Plugin for Netris Controller
    • Overview
      • Key Benefits
    • Architecture
    • Prerequisites
    • UFM Configuration Requirements
    • Installation
      • Option 1: Deploy within an existing Netris Controller Kubernetes cluster
      • Option 2: Deploy as a standalone Docker container
    • Configuration Parameters
      • Netris Controller Configuration
      • NVIDIA UFM Configuration
      • Agent Configuration
    • Usage Guide
      • 1. Server Configuration in Netris
      • 2. Create a Server Cluster Template
      • 4. Create Server Clusters
      • 3. Verification
      • 4. Monitoring Integration Status
    • Functional Workflow
    • InfiniBand Security (Recommended)
      • What is MKey Protection?
      • Impact on Netris Integration
      • Configuration Steps
        • 1. Set the MKey Value
        • 2. Enable MKey Protection Level
        • 3. Enable VSKey (Vendor Specific Key)
        • 4. Restart UFM Service
        • 5. Verification
    • Monitoring and Troubleshooting
      • Viewing Logs
      • Common Issues and Solutions
        • Connection Issues to Netris Controller or UFM
        • PKey Assignment Issues
        • SHARP Reservation Issues
        • Synchronization Delays
    • Version Compatibility
    • Getting Started Guide
      • Quick Setup Example
    • Additional Resources
  • NVIDIA NMX-C (NVLink) Integration Plugin for Netris Controller
    • Overview
      • Key Benefits
    • Architecture
      • High-Level Workflow
    • Prerequisites
    • Installation
      • Installing the plugin
      • Loading GPU inventory
      • Netris-NMX Plugin Configuration Parameters
    • Verification
    • Maintenance and Deprovisioning
    • Additional Resources
  • Kubernetes Integration
    • Install Netris Operator
      • Helm Chart Method
      • Regular Manifest Method
    • Using Type ‘LoadBalancer’
    • Using Netris Custom Resources
      • Introduction to Netris Custom Resources
      • L4LB Custom Resource
      • V-Net Custom Resource
      • BGP Custom Resource
      • Importing existing resources from Netris Controller to Kubernetes
      • Reclaim Policy
    • Calico CNI Integration
      • Disabling Netris-Calico Integration
  • Netris-CloudStack Integration
    • High-Level Concept of Integration
      • How It Works
      • Challenges Addressed
      • Benefits
      • Use Cases
    • Compute and Network Architecture
      • Diagram Overview
      • Network Flow
    • Prerequisites
      • Step-by-Step Configuration Instructions for the Netris Controller
      • IPAM Setup
        • Create an Allocation
        • Create Subnets
      • Inventory Setup
        • Adding Servers
        • Creating Servers’ Links
        • Optimize BGP Overlay for Hypervisor
        • Adding Subnets for CloudStack Cluster
        • Enabling Internet Connectivity for ACS Servers
        • Enabling Access to CloudStack Management GUI
        • Creating CloudStack Networks
    • Server Configuration and Software Installation
      • Configuring Network on CloudStack Management Server (Server 1)
        • Understanding the Network Layout
        • Netplan Configuration
      • Install Netris-CloudStack Agent on Hypervisor Servers
        • Bringing Up NICs Before Installation
        • Pre-Installation Steps (For Deployments Without OOB)
        • Key Functions of the Netris-CloudStack Agent
        • Installation Steps
        • Example Successful Output of One-Liner Script
        • Verification Steps
        • Checking Network Connectivity
        • Finalizing the Network Setup
        • Keeping the Temporary OOB VNet for Emergency Access
        • Managing Additional NICs on the Server
      • Install CloudStack Management Service
        • Installation Steps
    • Configuring CloudStack for Netris Integration
      • Enabling the Netris Plugin in CloudStack
      • Initializing CloudStack Setup
        • Steps to Initialize CloudStack
    • Using CloudStack with Netris Isolation Method
      • Creating a VPC
      • Creating a Network Tier
      • Port Forwarding
        • Seamless Integration Between CloudStack and Netris
        • Step-by-Step Process for Configuring Port Forwarding in CloudStack with Netris
        • Key Notes:
      • Configuring Static NAT in CloudStack
        • How Static NAT Works with CloudStack and Netris
        • Steps to Configure Static NAT:
        • How CloudStack and Netris Work Together
        • Final Notes
  • Terraform: Netris provider
    • Install Terraform
    • Create a directory for Terraform files
    • Configure a provider
    • Prepare an infrastructure plan
    • Create resources
    • Delete resources
  • EVPN on Host
    • Overview
      • Supported Operating Systems
    • Use Cases
      • Managed Kubernetes
      • Other Uses
    • How It Works
      • Bare Metal GPU Nodes
      • Shared Nodes
      • Underlay Configuration
      • Packet Flow
      • Management Plane
    • Prerequisites
      • 1. Management V-Net
      • 2. Server Objects
      • 3. Server Networking Configuration
      • 4. Netris Controller
    • Installation
      • Install the EVPN-on-Host agent
      • Enable Underlay
      • Verification
    • Provisioning Tenants
      • Verification

Monitoring & Observability

  • Topology & Wiring Validation
    • Switch-to-switch and Switch-to-SoftGate
    • Switch-to-Server
  • NVIDIA NetQ Integration
    • Topology Blueprint Activation
  • Netris Healthchecks

Tutorials

  • Netris Host Networking
    • Overview
    • How It Works
    • Before You Begin
      • System Requirements
      • Dependencies
      • Recommended NVIDIA Component Versions
        • Spectrum-X v1.2.0
        • Spectrum-X v1.3.0
      • Permissions
    • Installation Overview
    • Installation
    • Configuration
      • 1. Review the Configuration File
      • 2. Configure BlueField3 NICs
      • 3. Verify BlueField3 NICs Parameters
      • 4. Start the NHN daemon
    • Operating the NHN plugin
      • Starting NHN
      • Monitoring NHN
      • Stopping NHN
    • Using the bf3-config
      • Command-Line Options
      • Examples
    • Using the Verifier
      • Command-Line Options
      • Examples
    • Network Configuration Formats
      • Network Manager Auto-Detection
      • Netplan (systemd-networkd)
      • Ifupdown (Ubuntu interfaces)
  • Netris VPC
    • Sites
    • IPAM
    • V-Nets
    • External connections
    • SiteMesh connections
    • NAT services
    • Load-balancing service
    • Access lists
    • Working with Netris VPC
  • Getting Started with Switch-Fabric Manager & VPC
    • Netris managed fabric Overview
      • Introduction
      • Concept
    • Installing HA Netris Controller in Air-Gapped Environments
      • Why Air-Gapped Installation?
      • Why a High Availability (HA) Cluster?
      • Prerequisites
      • Obtain the Installation File
      • Steps to Install
        • 1. Preparing Each Node
        • 2. Install K3s on All Nodes
        • 3. Import Necessary Container Images
        • 4. Configure kube-vip for KubeAPI High Availability
        • 5. Add Helm Chart Packages to K3s
        • 6. Verify and Scale Core K3s Components
        • 7. Deploy Kube-VIP Cloud Controller
        • 8. Install Traefik Proxy
        • 9. Deploy the Netris Controller
        • 10. (Optional) Enable SSL with cert-manager
        • 11. Set Up the Local Netris Repository
        • 12. Validate Your Deployment
      • After Installation
      • How to consume local repository
    • Upgrading HA Netris Controller in Air-Gapped Environments
      • Obtain the Upgrade File
      • 1. Preparing Each Node
        • 1.1 Transfer the File to the Servers
        • 1.2 Extract the Tarball
        • 1.3 Navigate to the Installation Directory
      • 2. Steps to Upgrade Controller
        • 2.1 Import Necessary Container Images
        • 2.2 Add Helm Chart Packages Upgrades to K3s
        • 2.3 Database backup
        • 2.4 Upgrade Netris Controller
      • 3. Steps to Upgrade the Local Netris Repository
    • Maintenance Procedures
      • Node Maintenance Best Practices
        • Individual Node Maintenance (Recommended Approach)
        • Full Cluster Maintenance (When All Nodes Need Simultaneous Maintenance)
      • Verifying MariaDB Cluster Health
      • Maintenance Best Practices
    • New Site setup
    • VPC setup
    • IPAM setup
    • Inventory setup
    • Topology setup
    • SoftGate HS
      • Overview
        • Services Provided by SoftGate
        • What SoftGate does not do
        • Hardware Requirements
      • Performance
      • Architecture Overview
        • SoftGate physical connectivity
        • SoftGate logical connectivity
        • SoftGate node Control Plane
        • SoftGate node Data Plane
        • SoftGate Roles and Flavors
      • Installation and Initial Deployment
        • Prerequisites
        • Installation Guide
      • Upstream/Border Routers (EBGP)
        • Configuring upstream BGP
        • BGP route exchange between SoftGates, upstream routers, and downstream switches
      • High Availability and Load Distribution
        • Netris VPC originated traffic routing
        • Internet originated traffic routing
        • Failover behavior
      • Observability and Operations
    • Netris Switch Agent Installation
    • Connecting Netris managed fabric to an ISP
    • Connecting servers to the Netris managed fabric
    • Enabling NAT services
    • Enabling Load-balancing services
    • More features

Miscellaneous

  • Accounts
    • Users
    • Tenants
    • Permission Groups
    • User Roles
  • Learn Netris Operations with Kubernetes
    • Intro
    • Install Netris Operator
    • Deploy an Application with an On-Demand Netris Load Balancer
    • Using Netris Custom Resources
      • Introduction to Netris Custom Resources
      • L4LB Custom Resource
      • Importing Existing Resources from Netris Controller to Kubernetes
      • Reclaim Policy
  • Custom NVUE Configuration Snippets

Release Notes

  • Release Notes
    • Netris 4.6.0 (Feb/10/2026)
      • What’s new in Netris 4.6.0?
      • Features
      • Enhancements
      • Bug fixes
      • References
    • Netris 4.5.3 (August/27/2025)
      • What’s new in Netris 4.5.3?
      • Features
      • Bug fixes
      • References
    • Netris 4.3.0 (July/31/2024)
      • What’s new in Netris 4.3.0?
      • Features
      • Bug fixes
      • References
    • Netris 4.2.0 (May/1/2024)
      • What’s new in Netris 4.2.0?
      • Features
      • Bug fixes
      • References
    • Netris 4.1.1 (Jan/31/2024)
      • What’s new in Netris 4.1.1?
      • Features
      • Bug fixes
      • References
    • Netris 4.0.0 (Jul/25/2023)
      • What’s new in Netris 4.0.0?
      • Features
      • Bug fixes
      • References
    • Netris 3.5.0 (Oct/24/2023)
      • What’s new in Netris 3.5.0?
      • Features
      • Bug fixes
      • References
    • Netris 3.4.4 (Sep/29/2023)
      • What’s new in Netris 3.4.4?
      • Features
      • Bug fixes
      • References
    • Netris 3.4.3 (Nov/09/2023)
      • What’s new in Netris 3.4.3?
      • Bug fixes
      • References
    • Netris 3.4.0 (Mar/06/2023)
      • What’s new in Netris 3.4.0?
      • New Platform Integration
      • Features
      • Bug fixes
      • References
    • Netris 3.3.0 (Dec/05/2022)
      • What’s new in Netris 3.3.0?
      • Features
      • Bug fixes
      • Various improvements and bug fixes
      • References
    • Netris 3.2.1 (Oct/05/2022)
      • What’s new in Netris 3.2.1?
      • Bug fixes
      • References
    • Netris 3.2.0 (Sep/22/2022)
      • What’s new in Netris 3.2.0?
      • Features
      • Bug fixes
      • References
    • Netris 3.1.0 (Aug/1/2022)
      • What’s new in Netris 3.1.0?
      • Features
      • Bug fixes
      • References
    • Netris 3.0.0 (Oct/6/2021)
      • What’s new in Netris 3.0.0?
      • References
    • Netris 2.9.0 (Mar/5/2021)
      • What’s new in Netris 2.9.0?
      • References
    • Netris 2.8.0 (May/13/2020)
      • What’s new in Netris 2.8.0?
      • Features
      • Bug fixes
      • References
Netris docs
  • NVIDIA NMX-C (NVLink) Integration Plugin for Netris Controller
  • Edit on GitHub
Previous Next

NVIDIA NMX-C (NVLink) Integration Plugin for Netris Controller

Overview

The Netris-NMX plugin provides seamless integration between Netris Controller and NVIDIA NMX-C (NMX-Controller) for AI infrastructures with NVIDIA NVLink Multi-Node (NVL72/NVL144) fabrics present. This integration allows infrastructure operators to define compute multi-tenancy in a single place through Netris, significantly simplifying management across all network types.

Key Benefits

  • Unified Management Interface: Define tenant isolation by simply listing servers in a Server Cluster object

  • Automated Provisioning: Automatically configure NVLink partitions on NVL72/NVL144 Multi-Node fabrics to align with tenant boundaries configured on other fabrics such as East-West (via Ethernet or InfiniBand) and North-South Ethernet.

  • Simplified Operations: Eliminate the need to manage SwitchPorts, VLANs, VRFs on Ethernet, GUIDs, PKeys, SHARP groups on InfiniBand), and NVLink partitions and GPU UIDs separately.

Architecture

The Netris-NMX plugin acts as the integration layer between Netris Controller and NVIDIA NMX-Controller:

  1. Netris Controller: Orchestrates the Ethernet switches and provides the primary user interface.

  2. NVIDIA NMX-C: Manages the NVLink Multi-Node fabric switches and provides specialized NVLink functionality.

  3. Netris-NMX Plugin: Synchronizes configurations between both systems

_images/NVIDIA_NVLink-Integration.svg

Tip

NVIDIA NetQ (NMX-M) is not required by Netris, but it is recommended for granular Network + GPU telemetry

When you define a Server Cluster in Netris, the plugin automatically:

  • Discovers GPU UIDs for each server using the preloaded GPU ledger.

  • Creates and manages appropriate NVL partitions in NMX-C

  • Assigns appropriate GPU UIDs to appropriate NVL partitions

The Netris-NMX plug agent runs continuously and validates that the operator’s intent is correctly applied every 20 seconds by default. If the NVLink partition doesn’t match the intent declared in the Netris Controller, the Netris-NMX agent will enforce the intent in the NMX-Controller.

The NMX-Controller remains the source of truth for the state of the GPU assignments to NVLink partitions. The Netris Controller is the source of truth for the operator’s intent, and the Netris agent will continuously enforce the operator’s intent as expressed through the Server Cluster object in the Netris Controller.

When more than one NMX-Controller is defined in the configuration, Netris will automatically discover which NMX-Controller creates the NVLink partition and will only create the partitions in the appropriate NMX-Controllers.

High-Level Workflow

  1. Preload GPU mapping

  2. Configure NVLink agent

  3. Agent discovers the current state from NMX-C(s)

  4. Netris determines the desired partition based on the server cluster template and server cluster membership.

  5. Agent reconciles every 20s

  6. Debug via script

Tip

Server Cluster is the only supported way for Netris to manage NVLink partitions.

Tip

Netris does not perform any additional NVLink management tasks, like NVLink switch life cycle management, etc., other than creating, modifying, and destroying NVLink partitions and adding or removing GPU UIDs to those partitions. NVIDIA NMX-C is the NVLink fabric manager.

Prerequisites

Before installing the Netris-NMX plugin, ensure:

  1. A functioning Netris Controller environment

  2. A properly configured NVIDIA NMX-C installation

  3. Network connectivity between the Netris Controller or a dedicated server running the Netris-NMX plugin and the NVIDIA NMX-Controller.

  4. Appropriate access credentials for both platforms

Installation

Installing the plugin

The Netris-NMX plugin can be installed on the same server as the Netris Controller or on a dedicated server, depending on customer requirements and network topology.

If a dedicated server option is chosen, ensure that the server running the Netris-NMX plug can reach all the NVIDIA NMX-Controllers in the environment. This dedicated server must also be able to reach the Netris Controller. All communication between the Netris Controller, NVIDIA NMX-C, and the Netris-NMX plug is initiated from the server running the Netris-NMX plugin.

  1. Download the Kubernetes deployment YAML file:

wget https://get.netris.io/netris-controller-nmx.yaml
  1. Edit the YAML file to update the secret values based on your environment:

nmx-config:
  verify-ssl: true
  cert-file: /home/ubuntu/netris-nvlink-agent/client.crt
  key-file: /home/ubuntu/netris-nvlink-agent/client.key
  root-ca: /home/ubuntu/netris-nvlink-agent/rootCA.crt
  common-name: nmxc-01.acme.com
  nmx-c:
     nmxc_01:
        addresses:
        - nmxc-01.acme.com:8601
  1. Apply the configuration to your Kubernetes cluster:

kubectl apply -f netris-controller-nmx.yaml

Loading GPU inventory

Netris must have the mapping between the GPU UIDs and the servers those GPUs are installed in preloaded before automatic NVL partition management can start.

Here is an example of the GPU UID inventory file:

hgx-pod00-su0-h00,875835130816197840
hgx-pod00-su0-h00,961186615343340613
hgx-pod00-su0-h00,796824814706104730
hgx-pod00-su0-h00,684212070855729123
hgx-pod00-su0-h01,718625720642846212
hgx-pod00-su0-h01,788578661925003442
hgx-pod00-su0-h01,910329703472956766
hgx-pod00-su0-h01,814561743235261831
hgx-pod00-su0-h02,996615732638596030
hgx-pod00-su0-h02,884228998345288014
hgx-pod00-su0-h02,730725932032980822
hgx-pod00-su0-h02,749618463645136824
hgx-pod00-su0-h03,893225768947662203
hgx-pod00-su0-h03,825286183620844317
hgx-pod00-su0-h03,784007583961668668
hgx-pod00-su0-h03,713366763878128965
…

Execute netris-nvl-loader script to import the GPU UID inventory into the Netris Controller

./netris-nv-loader --csv-file gpu-mapping.csv --netris-url "https://conroller.acme.com" --username "admin" --password "passw0rd"

Where

--csv-file <filename>    specifies the comma-separated value (CSV) file with GPU UID inventory

--netris-url "<URL>”     specifies the Netris Controller URL

--username "<username>"  specifies the Netris administrator username

--password "<password>"  specifies the Netris administrator password

Upon successful import, you should see output similar to the one below

INFO [0000] Found 72 GPU mappings in CSV file
INFO [0000] Logging in to Netris…
INFO [0000] Successfully logged in to Netris
INFO [0000] Fetching inventory from Netris (import mode)...
INFO [0001] Found 38 server inventory items
INFO [0002] Successfully updated server ‘hgx-pod00-su0-h00’ with 4 GPU mappings
INFO [0003] Successfully updated server ‘hgx-pod00-su0-h01’ with 4 GPU mappings
INFO [0004] Successfully updated server ‘hgx-pod00-su0-h02’ with 4 GPU mappings
…

You can further confirm successful import by examining the appropriate server objects in the Netris controller. In the Custom JSON field of each GPU server in scope, you should see a JSON object similar to the following
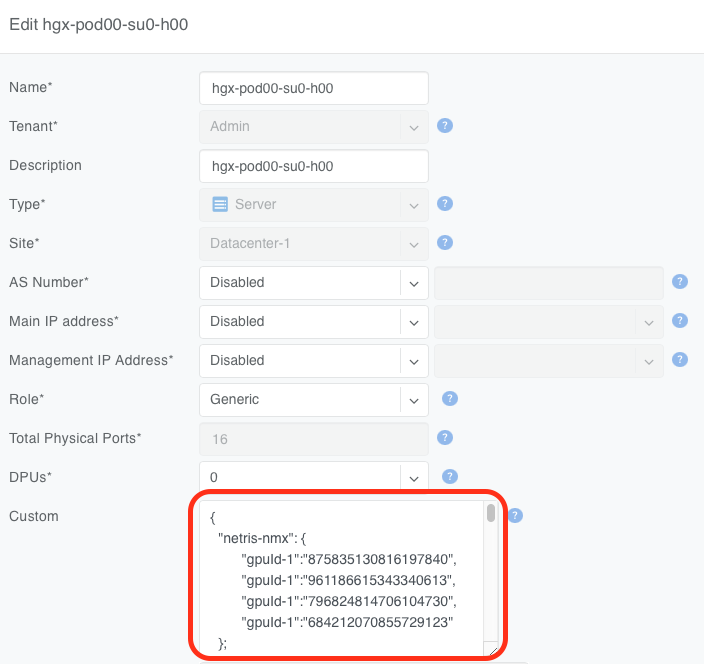
_images/NVL-Server-GPU-inventory.png

Warning

Netris does not enforce the completeness of the GPU inventory or whether the mapping is correct. Please ensure that you validate your inventory file content before loading the inventory into the Netris Controller.

Tip

In the most basic sense, when you create a Server Cluster using a Server Cluster Template that references NVLink integration, as shown in the Server Cluster documentation, Netris will look up GPU UIDs in the Netris server inventory for each server in the Server Cluster and create one NVLink partition per NMX-C named after the Server Cluster, including the Server Cluster ID, and assign the appropriate GPUs to that partition.

Warning

NVIDIA does not support NVLink partitions spanning more than one NVL domain.

Netris-NMX Plugin Configuration Parameters

The following configuration options are available in the Netris-NMX plugin YAML configuration file:

  • nmx-config - top-level mapping for the plugin configuration

  • verify-ssl - key to signal the plug whether to use TLS authentication when accessing the NMX-Controller

  • cert-file - absolute path to the client certificate

  • key-file - absolute path to the private key of the client certificate

  • root-ca - absolute path to the root CA certificate file.

  • common-name - must match the value of the CN field of the certificate presented by the NMX-Controller.

  • nmx-c - contains a mapping describing each NMX-Controller you’d like Netris to create NVLink partitions in. It must contain at least one key with a value of a list of hostnames and port numbers

    • addresses - is a list of hostnames and port numbers of each NMX-C node in an NMX-C HA cluster.

Each NMX-C must be presented through a separate key. The addresses key is intended to contain a list of every node in a single NMX-C HA instance.

In the deployment where each NMX-Controller requires a separate client authentication certificate, the relevant keys may be included in the mapping for that specific NMX-Controller, like so:

nmx-config:
  verify-ssl: true
  cert-file: /home/ubuntu/netris-nvlink-agent/client.crt
  key-file: /home/ubuntu/netris-nvlink-agent/client.key
  root-ca: /home/ubuntu/netris-nvlink-agent/rootCA.crt
  common-name: nmxc-x.acme.com
  nmx-c:
     nmxc_01:
        cert-file: /home/ubuntu/netris-nvlink-agent/client01.crt
        key-file: /home/ubuntu/netris-nvlink-agent/client01.key
        root-ca: /home/ubuntu/netris-nvlink-agent/rootCA.crt
        common-name: nmxc-01.acme.com
        addresses:
        - nmxc-01.acme.com:8601
     nmxc_02:
        addresses:
        - nmxc-02.acme.com:8601
     nmxc_03:
        addresses:
        - nmxc-03.acme.com:8681
        - nmxc-03.acme.com:8682

After successfully installing and configuring the Netris-NMX agent, you can use Server Cluster to create NVLink partitions via the creation of Server Clusters. You must update your Server Cluster Template to include NVLink integration. See the Server Cluster documentation for more details.

Verification

Netris ships nmx-get-partititions.sh script, which helps the operator to verify proper operation of the Netris-NMX plugin.

Below are a few examples of running the verification script.

The output shows that only a default partition is present in the NMX-Controller and no GPU UIDs are assigned to it.

> ./nmx-get-partitions.sh
=== NMX-C Partition Information ===
Gateway ID: gateway_id
Host: nmxc-01.acme.com:8601
===================================

Partition ID: 32766
Name: Default Partition
Number of GPUs: N/A
GPU UIDS:
- None
Health: NAX_PARTITION_HEALTH_HEALTHY
Type: NMX_PARTITION_TYPE_GPUUID_BASED

The customer may choose to configure the NVLink domain with a default partition (see NVIDIA NVLink Multi-Node Documentation for more details). Netris is fully compatible with this scenario and will remove the GPU UIDs from the default NVLink partition when those GPU UIDs are scheduled to be assigned to a new tenant partition.

The output below shows a new NVLink partition created with 8 GPUs after a server cluster was instantiated containing servers with those GPU UIDs. Note that the partition name contains the Server Cluster ID (192 in this example), which may be helpful during troubleshooting. Netris will always include the Server Cluster ID in the NVLink partition name.

> ./nmx-get-partitions.sh
=== NMX-C Partition Information ===
Gateway ID: gateway_id
Host: nmxc-01.acme.com:8601
===================================

Partition ID: 32766
Name: Default Partition
Number of GPUs: N/A
GPU UIDS:
- None
Health: NMX_PARTITION HEALTH_ HEALTHY
Туре: NMX_PARTITION_TYPE_GPUUID_BASED
—-----------------------------------
Partition 1D: 8593
Name: netris-cluster-192
Number of GPUs: 8
GPU UIDs:
- 875835130816197840
- 961186615343340613
- 796824814706184730
- 684212070855729123
- 718625720642846212
- 788578661925003442
- 910329783472956766
- 814561743235261831
Health: NMX_PARTITION HEALTH_ HEALTHY
Type: N/A
—-----------------------------------

Maintenance and Deprovisioning

If you need to perform maintenance on one or more GPU servers that are part of an NVLink partition, Netris recommends that you remove those servers from the Server Cluster before performing this maintenance. Doing so will remove the relevant GPU UIDs from the tenant’s NVLink partition.

Warning

Removing a server from a Server Cluster will also remove this server from ever and all V-Nets and VPCs that this server was a member of as a result of being a member of a Server Cluster. Netris will not remove this server from any V-Nets where the switch ports connected to this server were assigned to this V-Net manually or using Labels.

Additional Resources

  • NVIDIA NMX-C Documentation

  • NVIDIA NVLink Multi-Node Documentation

Previous Next

© Copyright 2022, Netris.

Built with Sphinx using a theme provided by Read the Docs.
Alternate Versions v: 4.6

Free theme by Read the Docs.